Anstey win through in 3-way club jamboree

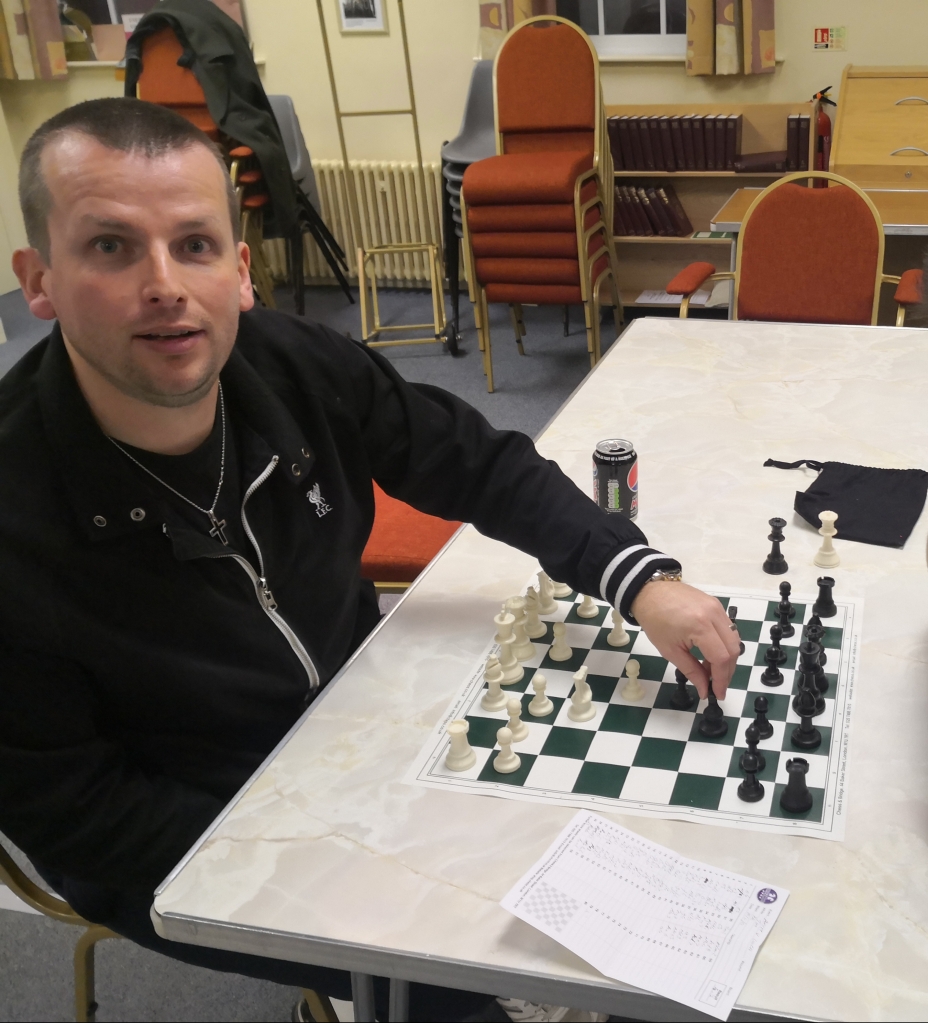
8/6/23 – In the first event of its kind for a while, certainly locally and since I can remember, having been involved in club chess for 10+ years, Anstey Chess Club invited 2 other clubs over to Anstey to play in a 3 way ‘Jamboree’ event.

El Presidente (Ben) formulated the idea during discussion with the LRCA (Leicestershire and Rutland Chess Association, to which we are affiliated) and the discussion was around shaking up the Summer Cups in the County. He has previously played for Radcliffe and Bingham in Nottinghamshire and Nuneaton in Warwickshire and, knowing a couple of contacts within the respective clubs, suggested the idea in February of this year. The idea was well received and after lengthy discussions about playing personnel, time controls, board order, and when/where it would happen, the format was decided.

Hosts: Anstey
Visitors: Radcliffe and Bingham; Nuneaton
Time Controls: 20 minutes + 10 second increments
Jamboree style board order: Teams drew lots to be designated as team A, team B and team C and A1 played B1, A2 played C1 etc.

Nuneaton were team A, Radcliffe and Bingham were team B and Anstey were team C.

In what was almost certainly a blessing on the night, El Presidente couldn’t talk, due to an operation in his throat (to cut a long story short) and Matt Connor was forced in to kindly agreed to be the MC on the night – nothing to do with his initials, although that may not be how it looks.

All players arrived in good time for round 1 and some very good chess was played by all teams, in both rounds. The abilities seemed to be very well matched but Nuneaton surged ahead with 5 points out of 6 boards after the 1st round – almost a perfect score. Anstey and Radcliffe had 1.5 and 1 respectively.

Round 2 commenced and, with nothing to lose, Anstey fought hard and scored a whopping 5.5 points in round 2 with Nuneaton only scoring 1 point, meaning that Anstey snatched victory from the jaws of defeat on the night. This was very eloquently put as ‘Sneaking up on the rails on the inside’ by Nuneaton’s captain. Radcliffe also managed to accrue some points in the final round with the totals for the evening being as follows:
Anstey – 7 points
Nuneaton – 6.5 points
Radcliffe and Bingham – 4.5 points

Post match discussions with playing personnel indicated that the night was a huge success and all of the players indicated that they would like to do the same next year, and we will be doing this again, for sure. Anstey will soon be visiting Nuneaton themselves and doing a similar thing with Anstey, Nuneaton and Kenilworth, albeit these discussions are in their infancy.

Well done to all involved for a very special evening, thanks especially to Nick London of Radcliffe and Bingham chess club, Colin Green of Nuneaton chess club and of course to all of the players for travelling and taking part in what was a fabulous night of chess.

Tales in the opening – the first move

Seasoned chess players around the world recognise three main parts of the game – the opening, the middlegame and the endgame. Every part is important and could lead to one side winning the game, but there is a certain fascination with the opening which is unprecedented. In these series, we will take a look at the main openings and the amazing variety of games and positions arising from them.

The opening of a chess game has always been the most serious contender for the minds and hearts of the chess improvers. One of the main reasons for this could probably be attributed to the commiting nature of the opening for the players. With their first moves, both Black and White decide the direction and more importantly the nature of the game – whether it is going to be a tactical chaos with multiple explosions about to errupt on the board, or a solid positional competition, where every piece shuffle might be the subtle advantage to turn the game. To quote our very own chairman Ben who summarised the importance of the opening a few months back in his interview for our website:

“I don’t have a favourite part of the game. I guess if I had to choose, I would say the opening. The reason is that I view a game of chess like building a house. To build a house you need a solid foundation, just like in chess you need a solid opening to build your game from.”

It is easy to underestimate the importance of the above statement, and it is fascinating how often people jump from one opening to another without a clear idea of the positions arising from their newly chosen first lines. Using the above metaphore, we could easily extrapolate that this approach is like building different house foundations without the vaguest idea of how the houses are going to look like.

Okay, we have stated how important openings are, but how should we go about picking our own opening and how much time should we spent on becoming proficient in it and the positions arising from there? It is fair to admit that this is a complicated question, depending on a few important variables: what positions do you prefer, how much time are you able to spend on studying the opening, when would you like to throw your opponent out of preparation and ‘the book’ … One thing is for sure – no matter what your answers are to those questions, there is an opening line suiting those answers. Our aim in this long series will be to present you with the main options and their peculiarities. In our above-stated line of thought, it is only fair to lay the foundations of the chess openings by listing the most common first moves from White and Black, giving a short summary of the different openings the positions lead to. We start with the two main favourites, centuries-old catalysts of many heated discussions between chess players around the world – 1.e4 and 1.d4.
1.e4…

An ancient opening which on paper has been considered the best first move forever. The e-pawn opens diagonals for the queen and the light-squared bishop, and immediately takes control of d5 and f5 in the centre of the board. There are many replies from Black, leading to many different games and positions, for example:

1…c5 – the Sicilian defence. The most popular reply from Black in the chess.com database, widely considered the best option for Black if they are playing for a win. Being one of the most combative and popular choices of reply, this opening is highly technical and people should be familiar with quite a lot of ‘book’ variations and emerging positions, including Classical, Dragon, Accelerated Dragon, Scheveningen, Najdorf, Sveshnikov, Kalashnikov, Taimanov, Kan, Four Knights, Rossolimo and Moscow variations among others.

1…e5 – another very common reply, leading to a variety of different games. A common development for both players includes 2. Nf3 Nc6 whereby White attacks the e5-pawn while Black defends it, with both players developing a knight. From this position, there are many opportunities for White to lead the game in different positions – Italian game, Spanish game (Ruy Lopez), Scotch game, etc. A very popular line from Black to reply to the threat from 2.Nf3… is to create a threat of his own with 2….Nf6, and this line, called the Petrov is quite popular and used recently in the last World Championship, played between GM Carlsen and GM Nepomniachtchi. A more solid approach for Black might be to play 2….d6, leading the game into the Philidor defence. Alternatively, if White wants to take a different path as soon as the second move, there are more options: 2.Nc3… leading to the Vienna game, 2. Bc4… which is transpositional, even 2. f4… – the King’s gambit, among others.

1…e6 – the third most common reply from chess.com database, leading usually to the French defence. Another response which is gaining popularity, is the e6…b6 setup from Black, most recently popularised by GothamChess IM Levy Rozman. A less popular, but interesting choice to continue might be St. George defence, with e6, a6 and b5, and the aim to play c5, attacking the centre.

1…c6 – another solid option for Black, leading most commonly to the Caro-Kann defence, with its multiple theoretical lines.

1…d6/1…g6 – these moves are placed in the same bracket, as they usually lead to the Pirc and the Modern – structures similar to the King’s Indian defence.

1…d5 – straight confronting White in the centre, a reply known as the Scandinavian defence.

The above are in summary the most common replies for Black, but there is no limit to the way they want to play, including with some more untypical line like the Alekhine, the Hippopotamus, or others.

1.d4…

The other representative of the e4 vs d4 debate, with ancient history behind it, is the second most common move in the chess.com database, not far away from its companion above. Similar to 1.e4, this move opens up the queen and the dark-squared bishop, and the pawn strikes in the centre, controlling e5 and c5. Needless to say, there are probably as many replies to 1.d4, as there are to 1.e4, if not even more.

1…Nf6 – arguably the most flexible reply. This move is very transpositional and it could lead to many lines. From here, White can decide to go for a variety of lines, including:

  1. 2.c4…, leading to Queen’s Gambit (yes, like the series) lines or the Catalan, which is a common choice of many Grandmasters, including GM Magnus Carlsen and GM Ding Liren. The variety in Black’s reply is quite large, including the Queen’s Gambit highly theoretical lines, the King’s Indian defence, the Benoni, the Nimzo-Indian, the Grünfeld, and many others. Usually all these lines are highly theoretical, and a player should really spend some time studying them, regardless of which colour they play.
  2. 2.Bf4… – the London system. This is an opening where White is usually looking for the same setup, regardless of what Black plays. Played like a system, the less theory and the solid nature of this opening makes it very often preferred by people who do not want to spend too much time studying openings or do not have the time to go for very theoretical lines.
  3. 2.Nf3… is another very flexible and transpositional move and could lead to many different lines, including all of the above.
  4. 2.Nc3… is a more dirct reply from White as the knight is looking to support an e5 pawn push. This move is also part of another line, known as the Jobava London system – a very transpositional opening, aiming at creating tactical opportunities for White early on in the game.
  5. 2.Bg5… – the Trompowsky attack. This opening has recently received quite a bit of attention as it was another line popularised by GothamChess.

There are of course, many other replies and lines following 1…Nf6, but luckily for d4-players, they usually end up in the same setups. The move 1…Nf6 could also be substituted by the second most popular move with both leading more or less to the same lines.

1….d5 – with this move, Black states that they are going to fight for the centre. One of the most popular continuations is the Slav defence, with its many theoretical lines: Main Slav, Exchange Slav, Semi-Slav(an opening on its own), Chebanenko Slav, Alapin variation, Czech variation, and others. As mentioned in the previous line, we could again meet transpositions, as after White’s second move, 2…Nf6 leads to some of the above lines.

1….e6 – another very flexible and transpositional move. Here White can choose to play 2.e4… and opt for the French defence, while on the other hand 2.c4… leads again towards the Queen’s Gambit lines above.

1….d6 – a very interesting move which gives Black options for Philidor or King’s Indian – type setups, as well as opportunities for more enthusiastic approaches like the Hippo. It could also transpose into the Benoni further down the road.

1….f5 – the Dutch defence. Another one of the common replies from Black which looks a little like a mirror image of the Sicilian,

Although not as popular, there are other options for Black to reply to 1.d4…, some of the most notable being the Englund Gambit with 1….e5 and the Modern with 1….g6.

Other first moves

There are in total of 20 first moves that White can play, and they had all been pretty much played in the history of chess. Nevertheless, there are sounder options, and there are unsound options, although so early in the game nothing is fatal and any position could be held by either player. The openings which are not part of the above lines, are considered slightly inferior, and are often called ‘Minor’ openings. Some of the most notable representatives of this class are the following:

1.c4… – the English opening. A very popular choice which is not so different from the Catalan in the sense that White aims for similar development, including fianchetto-ing their light-squared bishop. A very tactical, yet solid positionally opening, the English is a favourite of many players, including at Master level.

1.Nf3… – another very popular choice, the Réti, named after the great 20th century player Richard Réti. Possibly the most flexible opening move, this very transpositional move gives options for most of the lines above, with either e4, c4, or d4 played on the second move, or just fianchetto-ing the light squared bishop in the lines of the King’s Indian Attack.

1.f4… – the Bird opening, named after the 19th century player Henry Bird. Although not as direct as the main opening moves, this move also aims at controlling the centre. However, White always has to be careful about kingside attacks and checks on the e1-h4 diagonal. Nevertheless, a solid minor choice by White to open.

1.b3…/1.g3… – although these moves can lead to vastly different positions, they are quite similar in the sense, that White does not attack the centre straight away, and is looking to get a bishop fianchetto-ed and then attack the centre of the board.

There are, of course, other alternatives to the all of the above moves and lines, from the ‘creepy-crawly’, to the Sodium opening, there are many ways for White to open and Black to reply. However, in the series we will be looking at the main lines played by Masters, tested and passed the challenges of history. Join us next time, when we will be looking at one of the most popular and old lines, favourite of the tactical players and lovers of the sharp lines, the Italian game.

Basic Checkmating Patterns – Part Four

When it comes studying chess, one of the most underestimated elements of the game are the checkmating patterns. In this series we look at this very important part, focusing on the most common checkmates and characteristic patterns leading to them.

We have already looked at the majority of the pieces and their abilities to deliver checkmate. In this part of the series we take a look at the checkmating ability of the last piece we look at – the bishop. Controlling diagonals, this mighty piece always relies on the assistance of another piece, whether it would be a queen, rook, or even another bishop. Below we look at five common patterns involving a bishop and a major piece.

1. Morphy’s mate

Named after the great Paul Morphy, this checkmating pattern is one of the most popular positions in the world of chess. The pattern is executed with the combined action of the bishop and a rook.

As seen from the diagram above, the black king is completely cut off on the h-file, with his own pawn preventing the king from moving around the h-file. The rook cuts off the g-file, completely restricting the king’s movement. The only thing left for the pattern to work is the bishop delivering checkmate from d4. This pattern could also be used in conjunction with a discovered attack as seen from the diagram below.

The above position is from the game Reshevsky – Shainswit, 1951. In the actual game, Black resigned after Rg3+ since, as seen above, the only moves to slow down the checkmate are giving up the queen and the rook. An interesting fact is that the checkmating pattern received its name from a game in which it did not feature – Paulsen – Morphy, 1857. The game inspired an idea for building up into the checkmating pattern using a beautiful queen sacrifice against a kingside castled king.

By taking the knight, the queen threatens mate in one with Qxg7# so taking back with the g-pawn is compulsory. This opens up the g-file, creating the opportunity for the white rook to cut the black king off with a check, followed by the lethal blow from the bishop with Bxf6#.

2. Pilsbury mate

Named after another great XIX century player in Harry Pilsbury, this checkmate pattern is quite suited to be trained alongside the abovementioned Morphy mate as they are virtually variants of the same idea. In this particular pattern, the bishop and the rook work in the same way as in the Morphy mate but this time the rook delivers the final blow, as the bishop is controlling the king’s escape.

In the example above, the bishop is controlling the long a1-h8 diagonal, and with the black king restricted by his own pieces, the rook slides over to g1, delivering checkmate. The below diagram shows one possible buildup for this checkmating pattern. The position is from Savic – Radojevic, 2006.

After the white bishop captures the black knight, it seems that the white queen is up for grabs, but capturing it, as seen above, unleashes the potential of the dark-coloured black bishop and the remaining white rook. Not controlled by the black knight anymore, the dark-squared bishop gives a check on g7, followed by a discovered check with Bf6+, and after the queen tries one last attempt to stop the checkmate, the rook captures the black lady with a crushing Rxg5#. It is worth to note that just retaking the white bishop at the first move as opposed to capturing the ‘hanging’ queen would have freed an escape square on f7 for Black, should he needed it. Another common buildup to the Pilsbury mate involves a rook/queen sacrifice.

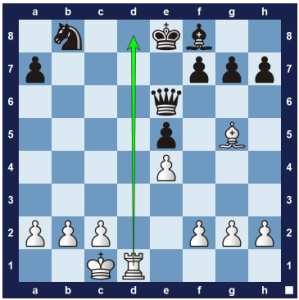
In this case, the rook sacrifices itself on g7, thus opening the g-file for the bishop and the d1-rook. It is important to note that after the king slides over to h8, any move other than the double check Rg8+ is most likely losing for White, as the knight can block the bishop on d4, while the queen could exchange itself if needed. However, the double check means that the black king has to do something about it and the only option is to retake on g8, hence giving White the opportunity to execute checkmate with Rg1#.

3. Opera mate

The Opera checkmate pattern takes its name from a famous game called the Opera game. Unsurprisingly, the origins of this patter come from Paul Morphy again, who played against the Duke of Brunswick and Count Isouard in Paris, in 1858, while watching opera. This pattern again involves the combined action of the rook and the bishop, and is another pattern that is probably best learned in conjunction with the abovementioned Morphy and Pilsbury mates, as it relies on similar principles. The final position of the actual opera game is shown below.

The black king is cut off by his own pieces, and just like in the Pilsbury mate, the bishop is controlling his only squares. What is left for the white rook, is to deliver swiftly checkmate on d8. In the actual game, this move was preceded by a beautiful queen sacrifice well in the tradition of the great Paul Morphy.

The pattern is quite common when the enemy king is protected by a triangle pawn structure, like in the King’s Indian and Pirc defences. It is important to note, that the rook could be anywhere on the rank/file where the checkmate is delivered, as long as the opposing king is controlled by the bishop.

In this last example, the material advantage and mating threats do not help black, as the white rooks attack Black’s back rank, weakened significantly by the activity of the bishop. All the moves are forced and White emerges triumphant after 1. Rd8+ Rxd8 2. Rxd8#.

4. Balestra mate

In the last two examples, the powerful combination of the mighty queen and a bishop is looked at, starting from the Balestra mate. This checkmating pattern takes its name from a fencing term for powerful lunges, as the bishop lunges to checkmate the opposing king, restricted by the powerful queen.

As seen in the above diagram, the black king has only one square left to move, which is conveniently situated on a light square. The white bishop lunges with Bc6# swiftly delivering checkmate. In the game Bang – Sayre, 1921, Black explores this pattern to deliver checkmate on move 27.

The combined work of the queen and the bishop leads to series of forcing moves to get the white king on c1, cut off from the b-file and the d1-a4 diagonal by the black queen. The bishop performs only a small hop this time to deliver the final blow with Be3#.

5. Max Lange’s mate

The last checkmating pattern in this article is the Max Lange’s mate, named after another player from the XIX century and involving again the queen and a bishop. This checkmating pattern exploits weak squares around the king.

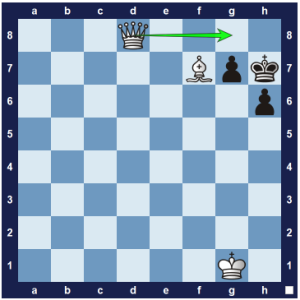
In the above example, the light squares around the black king are very weak and the queen and light-squared bishop exploit them with their combined action. The bishop restricts the king on the h-file, covering the two possible escape squares g8 and g6, while the queen controls the back rank, completely restricting the black king. The queen delivers the checkmate with Qf8#. An example of a beautiful buildup and execution of this checkmate pattern is found in the game Sikorova – Quinn, 2001.

With the black queen looking to exploit the white king’s exposed position, White has to keep playing only forced moves. As seen from the diagram above, with series of checks, including a rook sacrifice, the black king is forced on h8, with the white bishop positioned perfectly on f7. The white queen jumps on c8 to deliver one check, and then slides over with a Qg8#, checkmating the black king.

Basic Checkmating Patterns – Part Three

When it comes studying chess, one of the most underestimated elements of the game are the checkmating patterns. In this series we look at this very important part, focusing on the most common checkmates and characteristic patterns leading to them.

In this part of the series we take a look at common checkmating patterns involving the knight. With its peculiar movement, the horse-looking piece usually needs an acomplice in executing the pattern, whether it will be a rook or a queen.

1. Anastasia’s mate

To execute Anastasia’s mate, a player would need a knight and a major piece – either a queen or a rook. The function of the knight is to cut-off the king in the corner of the board and it usually accomplishes the task with the help of an enemy pawn. The major piece involved, most commonly a rook, then delivers the checkmate on the file where the king is stuck. The name comes from the 18th century writer Johann Jakob Wilhelm Heinse’s novel ‘Anastasia und das Schachspiel’. The following position is one of the most common ways to deliver the checkmate:

The king is stuck on the h-file and Rh3# proves to be devastating, as the knight cuts off the king from the g6 and g8 squares, while the black pawn restricts the king from escaping on g7. Another example of the pattern is shown below, this time with more pieces on the board and in addition, the rook is attacking the back rank, as opposed to the h-file.

Although someone could argue that the above diagram shows a back rank mate, this is again a typical example of an Anastasia’s mate. The king is again cut off on the back rank from the knight and the rook delivers the checkmate swiftly on d8. The final diagram is taken from the game Hammer vs Carlsen, 2003, Greece.

White tries to kick out the knight by attacking it twice, but they are too slow as Black happily sacrifices the queen to free the h-file for the rook which promptly delivers checkmate.

2. Corner mate

Unlike most of the checkmating patterns which we looked at so far, the Corner Checkmate’s name has the simplest background in the world of chess. The idea of this pattern is to exploit positions where the opponent’s king is stuck on one of the corners of the board. This pattern is usually executed by the combined activity of the knight and the rook.

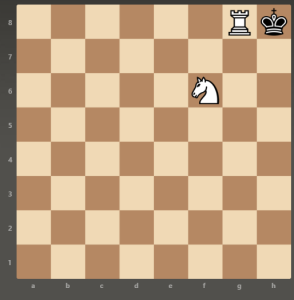
In the diagram above, the king is cut off from any other squares on the h-file by his own pawn. The knight jumps on f7 to deliver check, discovering the control of the g-file by the rook and completely cutting off the black king and thus delivering checkmate. This is also a good example of a tactical pattern, called Discovered Attack, which we would look at in another series in the future. An example of exploiting the position of the opponent king to deliver corner mate is shown in the diagram below which was taken from the game Myers vs Polyakoff, 1955.

The white rook is looking to skewer the black knight after attacking the queen. Unfortunately for White, the queen sacrifices herself to free the f2 square for the black knight, as the only escape route for the king (the g-file) is cut off by the rook. Even worse for White, the queen has to be taken as otherwise we end up in the other version of the corner mate, as shown in the below diagram.

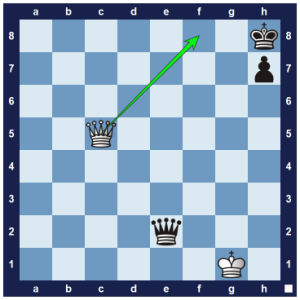
Unlike with any other piece, the queen does not need anyone’s help to deliver corner checkmate. The unique abilities of this strongest piece to control both files and diagonals makes it the perfect attacker, since the only escape square for the king (h7) is occupied by the black pawn.

3. Hook mate

Another common checkmate pattern delivered by the combined efforts of knight and rook (or obviously queen, as it has all of the rook’s properties and strengths) is the Hook checkmate. Its name comes from the resulting shape of the attacking pieces, resembling a hook.

As seen in the above diagram, the king has no squares, as the rook is covering the eighth rank, the knight is attacking the d7 square and the white pawn covers the d6 square. If it were Black’s move, the king would have the escape through c6 and b5, but unfortunately for them, White attacks the king with Rc8# which is the lethal blow since all escape squares are covered or blocked, as in the case with the black pawn on b7. This pattern featured in a famous game from 1892 between Frank Marshall and William Napier, as seen from the diagram below.

In this example, White is down quite a lot of material. Nevertheless, Marshall uses under promotion to a knight to cut off the black king from escaping and paralyses Black due to the delivered check. To make it worse, after Kh8 the knight jumps on g6, discovering a check from the rook. The king goes back to h7, only to be checkmated with Rh8#. Unfortunately for Black, Kg8 after the promotion would not help, as the hook mate works in the other direction as well after Ng6 Kf7 Rf8#.

4. Vukovic mate

The rook and the knight have a centuries-long partnership as seen previously in the Arabian mate and the checkmate patterns showed so far in this article. The Vukovic mate is another example of the success of this partnership in delivering a mate. This time the tandem is helped by another piece in squeezing the opposing and king and eventually delivering the final strike. The pattern is named after IM Vladimir Vukovic who showed it in his brilliant book “The Art of Attack in Chess”.

As shown in the above diagram, the black king is completely cut off by the white knight and rook. With the help of the pawn on e7, the rook arrives on f7, delivering checkmate. The role of the pawn is very important, as it supports the rook in the attack, and it could be also performed by a king or a bishop. An example of this checkmate pattern was the game between Williams and Staunton from 1851.

The white king attacks the black rook, but then the black knight comes to the rescue with a strong attack on the king resulting in the position we are looking for when aiming to deliver Vukovic checkmate. With the help of the black king controlling f2, the rook steps bravely on this square, delivering checkmate with Rf2#.

5. Smothered mate

The last checkmate pattern we will be looking at is the probably the most beautiful knight action on the board. The pattern takes its name from the position of the opponent king which is completely cut off and unable to move. The knight jumps unopposed in the vicinity and swiftly delivers checkmate.

In the above diagram, the king is surrounded by its own pieces, completely cutting him off from any escape squares. The only thing left for the white knight is to jump with Nf7#. One of the most beautiful buildups for the pattern includes a queen sacrifice to ‘smother’ the king.

The knight and the queen work very good together with a double check to push the enemy king in the corner. The queen then sacrifices itself on g1 to create the ‘smothered’ structure after which the knight jumps with Nf2# to deliver the final blow. Notice that the knight has to initially jump on h6 as opposed to any other square. This way the minor piece supports the g1 square, so the white king will not be able to capture the black queen as the checkmating pattern will not work. Another example for a smothered mate comes from the very famous Caro-Kann defence, Karpov variation, where if Black gets carried away and does not pay attention, it could be lethal for them.

The move Qe2 from White is very important as it creates the configuration of an absolute pin, as the knight is looking to free the e-file for the queen’s dominance. This way the e7-pawn cannot capture the knight and the Black king is mated on move 6. This sequence is a great example of combining different tactical ideas – in this case a discovered attack from the knight and a pin from the queen combine with the smothered mate to win the game for White.

Basic Checkmating Patterns – Part Two

When it comes studying chess, one of the most underestimated elements of the game are the checkmating patterns. In this series we look at this very important part, focusing on the most common checkmates and characteristic patterns leading to them.

In part two of the series we will turn our attention on various checkmating patterns involving the heavy artillery of the chess pieces – the rooks and the queen. At the end we will look at a famous trap involving a thematical queen sacrifice.

1. Lawnmower checkmate.

Also known as the ‘Ladder checkmate’ and the ‘Rook’s Roller checkmate’, the Lawnmower Mate is one of the basic checkmating patterns which every beginner ought to know. It could be done with either a queen and a rook, two rooks, or even two queens, if a pawn has been promoted. The actual pattern involves alternating the pieces in cutting off files or ranks for the opposite king, until the latter is pushed in the corner and checkmated, as shown in the below picture.

As mentioned above, the checkmate could also be delivered using two rooks, however, the player trying to deliver the mate should be careful not to hang the rook closer to the king, usually accomplished by moving the rook on the other side of the board.

2. Blind swine checkmate.

Commonly encountered in chess is the expression “Pigs on the 7th” referring to two rooks on the seventh rank (if White, on the second rank if Black). Following the same reference idea, a Blind swine checkmate is usually delivered by two connected rooks on the seventh (second) rank, whereby the opposite king is on the last rank and its escape towards the central squares of the rank is cut off by either opposite or same colour piece.

In the below example, both black rooks land on the second rank and after quick grab of the black queen by its white-coloured counterpart, the blind pigs start devouring the second rank and eventually deliver mate.

In the game between Swiderski and Nimzowitsch from 1905, the German chess master used a combination of a queen sacrifice, powerful centralised knight and two rooks infiltrating on the seventh rank to defeat the famous Danish Grandmaster Aron Nimzowitsch. As result of the great control of the f8-square exercised by the white knight, the black king has only two squares to move and is shortly mated in spite of being six points up in material after the white queen sacrifice.

3. Triangle checkmate.

A common pattern leading to checkmate is the RailRoad method. In this method, the attacking queen and one of the rooks push the king towards the edge of the board until one of the attacking pieces usually delivers checkmate. The two main ways in actually delivering the final blow are the Triangle checkmate and the Killbox checkmate.

The Triangle checkmate is usually delivered when a piece is restricting the movement of the opposite king on the file/rank the latter occupies. The attacking queen and rook take turns in squeezing the king while protecting each other with the use of the queen’s ability to control diagonals as well as files/ranks. Eventually, the queen delivers the checkmate, with the resulting formation resembling a triangle which is the root of the name for the checkmate pattern.

The same principle can be used to push the defending king towards the edge of the board if there is no piece to restrict its movement, as shown in the below diagram from the Durin vs Bross game from 1958.

4. Killbox checkmate.

The second checkmate pattern involving the RailRoad technique (sliding the queen and rook on the sides of the king, similar to the train wheels on the rail roads) is the Killbox checkmate. This pattern takes its name from the powerful work of the queen and the rook to create the so-called ‘kill box’, trapping and checkmating the defending king. As opposed to the above Triangle mate, this time the rook delivers the final blow to the opponent.

In the Geller vs Kogan game from 1946, White utilises the above checkmating idea in combination with a rook sacrifice. After Black accepts the sacrifice, Geller creates the “Kill box” and finishes off his opponent.

5. Legal’s checkmate.

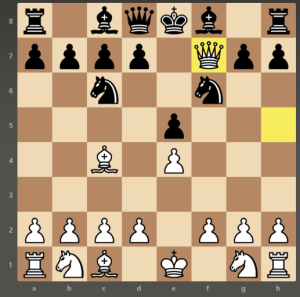
Legal’s checkmate is a beautiful checkmating pattern which arises from an opening trap involving queen sacrifice. Usually played by White, it is named after the French player Sire de Légal who allegedly played the trap in 1750 against Saint Brie in a game at rook’s odds. Nowadays, the opening trap is commonly encountered, especially at amateur levels, and it usually occurs with the following line:

Although it is commonly played by White, Black can also use similar concept and deliver checkmate, albeit with a bishop as opposed to the knight. The trap usually arises from the Petrov’s defense and the checkmate is acheved in the following manner:

Involving a queen sacrifice and checkmating patterns with minor pieces, the Legal checkmate is a compulsory pattern to know especially for players at amateur and club level.

Basic Checkmating Patterns – Part One

When it comes studying chess, one of the most underestimated parts of the game are the checkmating patterns. In this series we look at this very important part of the game, focusing on the most common checkmates and characteristic patterns leading to them.

In the first part of the series we will look at some of the most basic checkmating patterns which are more or less compulsory to know by any player regardless of their level.

1. Fool’s mate.

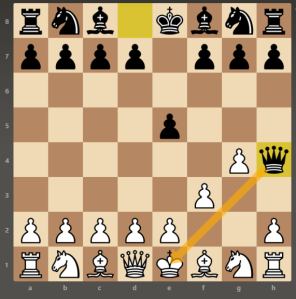
The Fool’s mate is the only two-move checkmate in chess. It is achieved by through the sequence 1. f3 e5 2. g4 Qh4#. As the name of the checkmate suggests, it requires a significant blunder by White which rarely occurs even at beginner levels. However, it is always a useful pattern to have in mind as it places emphasis on the importance of protecting the e1-h4 diagonal for White and the e8-h5 diagonal for Black which are the routes for the mating attack. The usual way of doing this (for example, in the Dutch defence) is by placing your knight on f3 for White or f6 for Black, protecting the entry points on h4 and h5, respectively. A famous trap in the Dutch defence exploits the above idea:

Teed vs Delmar, 1986

2. Scholar’s mate.

Another basic checkmatting pattern is the four-move checkmate, known as the Scholar’s mate. The nightmare of many beginner players, it is by far the most used checkmating pattern at the lower ratings. The name of the pattern comes from a 1656 text by Francis Beale The Royal Game of Chess-Play.

There are various ways to get to the actual checkmate, the most common being via:

1. e4 e5

2. Qh5 (White attacks the pawn on e5) Nc6 (Black defends the pawn)

3. Bc4 (the bishop attacks the weak f7-pawn) Nf6?? (Black gets carried away with attack on the queen, blundering checkmate)

4. Qxf7#.

The position can be reached in different ways and it is one of the most played checkmating patterns in general, leading to quick wins even at online levels of 1000+ on chess.com. Although more experienced players are trained at the main ways to avoid it, as well as counter-attacking through exploitation of the early queen development by White, it is always an important pattern to remember, mainly due to its emphasis on the vulnerability of the f7-pawn.

In general, at the beginning of a chess game there are two ‘weak’ pawns on the board – f2 for White and f7 for Black. The reason they are called ‘weak’ is that they are basically protected by only one piece – the king. The latter fact often makes them a point for attack by the opponent’s pieces, including further on in the middlegame.

An easy defence and further plan for Black is to play 1. e4 e5 2. Qh5 Nc6 3. Bc4 g6 4. Qf3 Nf6. At the end of the sequence, Black has advantage in development, clear plan to fianchetto their bishop (click here for more on the fianchetto) and castle short, while White has a queen in the centre which is a target for pawns and minor pieces and is occupying the f3 square which is rather annoying for the g1-knight.

3. Back rank checkmate.

Another very common checkmate is the Back Rank mate which exploits situations when the white king cannot move on the second rank or the black king cannot move on the seventh rank and the first, respectively the eighth rank, is not sufficiently protected. As suggested by the name, one of the major attacking pieces (queen or rook) moves to the back rank delivering checkmate.

The most common checkmate on the back rank is when the king is still in an usual castled position with all three pawns restricting his movement and all major pieces have left the back rank. One of the simplest examples is shown below, where Black is so carried away with going for a checkmate, they completely forget about the weak back rank of their own and get checkmated in three moves.

Another common pattern leading to back rank checkmate exploits the abovementioned weak f2- or f7-square combined with the king being on the back rank on the g-file and the g- and h-pawn restricting his movement. The attacker uses a queen-led battery on the f-file and the patter starts with a check, pushing the king in the corner. In the following diagram, Black is ahead nine points of material, but their back rank is vulnerable leading to checkmate in three moves.

Although the most common obstruction of the attacked king consists of pawns in front of him, other pieces such as knights or bishops can also limit the king’s movement. In the game Bird-Zukertort from 1886, a beautiful combination by Bird leads to resignation by Black due to several threats of a back rank mate, with Zuketort incapable of dealing with all of them. With the endgame in sight on move 36 Black picks up the e4 pawn in an attempt to gain material advantage providing Bird with the opportunity to use the position of the white knight combined with the powerful rook on the d-file and the queen controlling two key diagonals. After 37. Qxf6+ Black resigned, a possible continuation with a back rank mate is shown below.

4. Arabian checkmate.

Possibly one of the simplest, yet often missed checkmates, is the Arabian mate. It is considered by some to be the oldest checkmate pattern in the game of chess and according to this article it has featured in old Arabian manuscripts intended for an older version of chess where the rooks and the knights were the most powerful pieces. The way to deliver an Arabian mate is with a rook and knight when the king is in the corner of the board.

The rook boxes the king to leave him only the h7 square, which is protected by the kinght while the latter also protects the white major piece. Whenever the king is in the corner and both rook and knight are in the proximity, it is a good idea to look for a pattern which will lead to the Arabian mate. For example, in the Reiner-Steinitz game from 1860, after being attacked by 15. f4 the black knight jumps on the f3-square from where it is capable to coordinate with a rook for delivering Arabian mate. White misses the combination that follows and greedily picks up the g4-pawn, opening the g-file for the rook. What follows is a beautiful queen sacrifice typical for the good old days of romantic chess.

It is worth noticing that Black offers the hanging queen first on h4 with the idea that Rxh4 would lead to the same checkmate pattern which is why White refuses the sacrifice. Nevertheless, after Qxh2+ Reinier is left with no choice and in the tradition of the period plays until the very end. In another game from the same era, Anderssen – Schallopp, played in 1864, Black delivers an Arabian mate with a beautiful combination and under the threat of a back rank mate (discussed above).

Black utilises successfully the f4-pawn, using it as an anchor for the rook, and the pin on the second rank, and after the rook sacrifice, the Arabian checkmate is delivered.

5. Damiano’s checkmate.

The last pattern discussed in this very first part of the series is the Damiano’s checkmate. The name comes from the work of Pedro Damiano, a 16th century chess player, who is considered to be the first person writing about this checkmate pattern, in 1512. Commonly encountered, this mate is delivered by the queen which is protected by a pawn on g6 (if White attacks) or g3 (if Black attacks) and it relies on the king being restricted by the pawn and another piece to move onto the f-file (or c-file if the attack is on the other side of the board, with the pawn on b6/b3 respectively).

One of the most common patterns leading to this checkmate starts with a rook sacrifice, either to lure the king on the h-file(a-file) or to open the latter file by taking the corresponding pawn on the seventh/second rank. In the below example, Black sacrifices two rooks in order to keep the white king on the h-file, before delivering the final blow with Qh7#.

A variation of the Damiano’s checkmate is the so called Damiano’s Bishop checkmate, where the anchor for the queen is a bishop as opposed to a pawn. In the following example, White uses their rook to attack the king and removing the knight and opening the g-file for the queen. Nxh8 is compulsory as without the knight to protect h8, the move will be a different type of checkmate known as the Opera mate, which we will discuss in a further part of the series. With the rook on e8 preventing the king’s escape, Qg7# is unavoidable.

Facing a chess master – Game #1

John Robinson vs Glenn Flear, British Championship Qualifier Tournament, 29/11/1976.

In this series we will look back at some of the games of John Robinson against chess masters. One of our most decorated players(currently rated 1967 FIDE), John has had decades of experience and has played against some of the biggest names in chess.

Today we look at a game John played more than 40 years ago against Leicester’s first Grandmaster(GM) Glenn Flear. The game took place as part of a Qualifier tournament for the British Championship in 1977. Although not a master at the time, Glenn Flear had already establised himself as a promissing young chess player who was destined to reach the highest levels of the game. John on the other hand was looking to qualify again for the biggest British chess competition after winning a spot for the 1972 British Championship.

John’s analysis notebook

Unfortunately for the future Grandmaster his game against our teammate turned into a disappointing loss. Playing with the white pieces, John started the game with 1. d4 which was met by the King’s Indian defence by Flear.

“He was regularly playing the King’s Indian Defence, so I was not surprised at all.” John remembers “On the other hand, I was often playing the Smyslov variation which specialises in advancing on the queen side while simultaneously being very solid on the king side.”

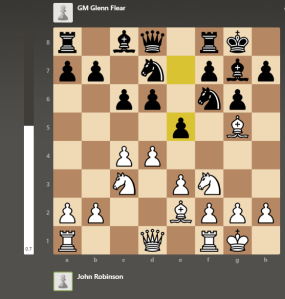
1.d4 Nf6 2. c4 g6 3. Nc3 Bg7 4. Bg5 d6 5. Nf3 O-O

Both players continued their development in a typical for this position way until move 8 when Black decided to start the middlegame proceedings with the thematic pawn break e5:

6. e3 Nbd7 7. Be2 c6 8. O-O e5

Although White appears to be slightly better in the above position, the tactical nature of the King’s Indian ensures that there is always an opportunity for either player to obtain advantage. Unmoved by the aforementioned pawn break, John continued with his plan, as did Glenn Flear. Both players carried on with the preparation of their attacks, with the future GM being slightly more active and chasing John’s dark-squared bishop back to the third rank with the benchmark h6-g5 pawn advance.

9. h3 Qe7 10. Qc2 h6 11. Bh4 g5 12. Bg3 Ne8

At this point John was conscious of the fact that the attack has started. Later in the postmortem of the game, he would write in his notebook: ‘Glenn plays for the attack on the king side, while White must press on the queen side.’ Sensing the imminent 13…f5, John decided that it is appropriate to respond to the threat with a threat of his own.

13. b4 f5 14. Rad1 e4

Black seemed to be already at the castled king’s door, but in the spirit of the Smyslov variation, John was prepared for the advance and stroke back on the queen side. However, he is interested in the last move and in his analysis after the game he wrote in his notebook: ’14…f4 might be better but leaves a lot of weak squares around the black king.’

“I was not surprised at any point during the game, to be honest.” John recalls. “I had played those Smyslov positions for a while, so I was prepared for the attack on the king side.”

While Black shuffled his pieces around in an attempt to break the blockade around the white king, John initiated an attack of his own by striking in the centre with c5. When the future GM decided to push d5 and close the centre, John continued with his plan to attack on the queen side with the powerful b5, further opening the b-file.

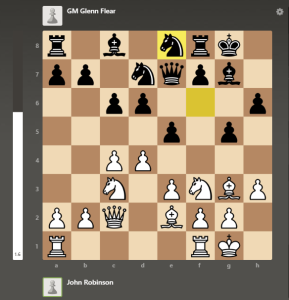
15. Nd2 Ndf6 16. c5 d5 17. b5 Nh7 18. bxc6 bxc6 19. Qa4 Rf6 20. Bh5!

In the analysis of the game, John places an exclamation mark on the last move and writes in his notebook: ‘A rather annoying move for Black to face.’

Although there is no difference in material, Stockfish (depth = 20) evaluates the last position as +1.3 with clear advantage for White. With John’s rook placed on b1 eyeing the freshly opened file and White’s infiltration on the queen side approaching fast, Black launched a counter-attack with f4. White’s setup proved difficult to break and despite the pawn storm on the king side, John managed to consolidate his position. The attack, however, proved that Black still had his chances and the engine gives high reward for Black’s initiative by evaluating the resulting position as roughly equal.

20. …Bd7 21. Rb1 f4 22.. Bh2 g4 23. Bxf4 gxh3 24. g3 Qe6 25. Kh2

Met with a strong defence, Black decided to be creative and sacrificed a rook in the hope of opening White’s blockade. The sacrifice, however, does not quite work and even though John evaluates the move as interesting, the engine’s estimation is far less generous and its evaluation is +1.5 after White’s light-squared bishop exerts a relative pin on the rook.

John explains the rationale behind this sacrifice: “He knew that there is no stopping White on the queen side while Black is basically stuck on the king side. He had to be creative in order to take the initiative and try and prise open White’s position.”

25…Rf5 26. Bg4

Down an exchange after the bishop takes the rook, Black was aware that there is no stopping of the queen side infiltration and threw everything in the charge of the white king’s fortress, engaging all pieces in the attack. In the meantime, confident in the solidity of his position, John parried all attacking attempts while placing his rook on the seventh rank preparing to destroy Black’s queen side.

26…Nef6 27. Bxf5 Qxf5 28. Rb7 Ng4+ 29. Kh2 Ng5 30. Qb3 Rf8

At this point the game was adjourned. In the pre-engines era, adjourning games was quite common and it basically meant that the players will finish at some point in the future.

“We had a lot more time for a game than now.” John remembers “An hour and a half for 30 moves, and after the thirtieth move we were allowed to adjourn the game. I had to write down my next move and place it in an enclosed envelope, then hand it to one of the officials. I don’t remember exactly, but it was at least a couple of days until we got to finish our game.”

The engine evaluates the position as +3.2. Even in the old days, Glenn Flear must have known that White is winning and he needs to do something extraordinary in order to win. A few days later the envelope was opened to reveal a simple rook move picking up a pawn. As John describes it: “I knew he will have hard time penetrating the defence on the king side, so I just picked up the hanging pawn.”

31. Rxa7 Be6 32. Rc7 Nf3

After moving the bishop away from the powerful rook, Black launched one last attack on the king side, starting with a knight exchange. John brought his queen back to the defence of the king while the future GM set up one last trap with a knight sacrifice.

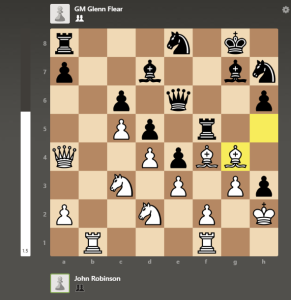
33. Nxf3 exf3 34. Qd1 h2 35. Rxc6 Ne5

An experienced chess player, Jonh spotted the trap and calmly took the knight with his pawn. He later writes in his notebook: “Hoping for 36 Bxe5 when 36…Qh3 would prove fatal for White.” Finding himself completely losing, with the perspective of playing an endgame where his opponent has two passed pawns and a full rook, Black resigned.

36. dxe5 1-0

Stockfish evaluates the final position as +6.4 with a clear advantage for White. An amazing game from John against a strong opponent.

John remembers: “Glenn went on to win the section and qualify to play in the British Championship (at 17 years of age!) and later (in 1986) became the first official Grandmaster in Leicester.”

John did not succeed in qualifying for the British Championship in 1977. Nevertheless, a brilliant game from our teammate and a valuable lesson for every player engaging in the Smyslov variation.

Presenting Anstey Chess club: Oskar

Welcome to the another interview from ‘Presenting Anstey Chess club’. In this series we present the players from the club and this week we had a chat with our second team captain Oskar Rudczenko. Another young promissing player from the club and dedicated contributor to the community, Oskar shares his insight into the game of chess and being a team captain.

AnsteyChessclub.co.uk (ACC): Hi Oskar, first of all thank you for taking part in the interview. To start with, tell us a little bit about yourself outside of the world of chess? Who is Oskar?

Oskar: Well I’m trying to get a driving licence so that I can visit my family more often, and I’ve recently been recruited as a mental health support worker at the Leicester General Hospital. Also, I volunteer for Bradgate Park and the Anstey Library, and I enjoy supporting both. Although Bradgate Park offers a lot more to do because of how huge the park is.

ACC: This sounds awesome! Are you currently studying or does the busy schedule leave no room for anything else?

Oscar (second from left to right) with the second team.

Oskar: I used to study and I completed one year of a three year Psychology course at De Montfort University. I left because it didn’t suit me, but I don’t regret having studied there; it was insightful. I’m not as busy as Ben (our chairman Ben Vaughan) is, but I do fill my time by learning new skills like learning a bit of Russian and exercising (cycling and weight lifting). I’m planning to join a rifle club in Groby as well.

ACC: Sounds like a lot! Let us turn our attention now to Oskar, the chess player. To start with, what is your current rating, both OTB and online?

Oskar: With OTB I’m 1120, but online I’m 800 in Rapid and 400 in Blitz, which of course is quite the range.

ACC: Which platform do you play online on? Chess.com, lichess.org, or another one?

Oskar: Just chess.com.

ACC: What is your favourite opening and why?

Oskar: Probably the Queen’s gambit for white, since it seems to be a very offensive opening and it allows for much more freedom of movement for the pieces when compared to something like the Caro-Kann. For black I use a variation of the Scandinavian defence, but I can use the King’s Idian as well if I am feeling like playing something different.

ACC: Nice! What type of player are you?

Oskar: I like to be much more aggressive when I can, and I just like to get in the opponents face when I can. Although I do like playing a defensive game as well because then the pieces have to unite together to make a fortress, which can be a great foundation for a strong attack.

ACC: What is your favourite part of the game? Are you more involved in the openings, do you prefer the middlegame battle, or do you like the endgame the most?

Oskar: I prefer the middle game because that’s when chess can get very complex and interesting, since that’s when all if not most of the pieces are still on the board. I have studied openings a bit but not all that much. It is interesting seeing the different ideas in different openings though.

ACC: And what is your least favourite part of the game?

Oskar: I guess the endgame since endgames can be less forgiving compared to the opening and middle game, because of the amount of pieces still on the board. Although, I will have to say the studying that people recommend is really not for me. I’d prefer to trial and error different things, which can make the game a lot more fun.

ACC: On this topic, how often do you study chess, if you do at all? And what do you do?

Oskar: Well I don’t read all that much, but I do watch youtube videos which explain what you should or shouldn’t do, as well as basic understanding of different openings. I mostly watch GothamChess, who’s really engaging, but I will look at different engine moves after an online game or even go briefly through an OTB game right after to reflect on what went wrong.

ACC: You mentioned that you have got quite a busy schedule which is about to become even busier. How often do you get the time to watch instructional videos and analyse games?

Oskar: Well I have time on the side sometimes. Recently I’ve had more time because I’ve not been doing that much volunteering or working so I’ve managed to play quite a lot of chess over the last couple of weeks, so I’ve managed to look at chess in a bit more depth than I have done before.

ACC: Who would you say is your favourite player? Who do you like watching play?

Oskar: I’d say Julian (first team’s Julian Tarwid) because he’s really enthusiastic about chess, and he’s very funny. For watching, I’d probably say Matt Connor (plays for both teams, deputy captain in Ben’s absence) because he has a different way of approaching chess than the other players. I’m not too sure what is different about him, but he seems more thoughtful and precise about his moves.

ACC: And who would you say is your model player? Who would you like to play like?

Oskar: Depends what I’m after. If I’d say I wanted more enthusiasm I’d say Julian, if I were to say dedication I’d say Ben. However, I might have to say Matt again, because to me he seems like a cold blooded killer when it comes to chess. I like the methodical nature of how Matt thinks.

ACC: Cool! Let’s talk a little bit about your captaincy of the second team. How did this come about?

Oskar: It’s kind of an underwhelming story. Basically back in the summer of 2019 the club had gotten a lot bigger, consequently the club could then play with two teams in the Leicestershire chess league. Ben held a formal meeting with the members at the time, including me, and he explained that we could play a second team and we need someone to be captain. No one really volunteered themselves, so I reluctantly offered thinking that it would be a lot of responsibility, but it’s actually very easy. Ever since I’ve happily been the second team captain.

ACC: What is the feeling to be a team captain?

Oskar: A proud feeling. It’s great to represent the club and what it stands for, which is to show sincerity and to play respectfully, or at the very least that’s the impression I’ve gotten from Ben over the years I’ve known him. It’s also great to see how far the second team has come, with strong players like Boris (Borislav Lazarov) and Hal (Hal Jardine) joining the team in 2021.

ACC: Describe a match day from your perspective as the second team’s captain.

Oskar: Well there was the most recent one, which was us versus Heathcote Arms 2. I lost, Hal drew, Boris and Matt won, and in very convincing fashion we won the match. There’s not much to it really, just welcome the opposing team, make sure everyone knows where they will be seated and that they know where the toilets are, and make sure my players know where they are going to the match venue. It’s just really comforting to know that there’s a full team you can rely on and trust.

ACC: Sounds really easy when you put it like that. A few final questions before we leave you to enjoy your Sunday. First of all, what makes Anstey Chess Club the place to go and play OTB?

Oskar: Everyone is a lot of fun to talk to, along with a very approachable secretary, very well managed website, and a lot of members who want to talk about and play chess. Sometimes it feels like it’s more of a social club than a chess club but that is why I’m still a member.

ACC: Thank you for the kind words, Oskar. Where and when can people find you – live and online?

Oskar: Well my chess.com username is OskarRud, and my email is oskarrudczenko@gmail.com if anyone has any questions about the club or the second team.

ACC: Finally, what advice would you give to the aspiring chess players out there?

Oskar: Surround yourself with people who love chess as much if not more than you do, and you’ll flourish.

ACC: Thank you, Oscar, you have been awesome! Feel free to share any last thoughts.

Oskar: Thanks for having me, and if anyone wants to come to the Anstey Chess club just contact me or Ben Vaughan and we’ll make sure you’re looked after and warmly welcomed.

Presenting Anstey Chess club: Ben

Welcome to the first interview from ‘Presenting Anstey Chess club’. In this series we will present the players from the club starting naturally with ‘El Presidente’ Ben who is our chairman. An experienced chess player and a busy father of one, Ben takes us through the joys of being a working dad, league chess player, owner of a chess club and junior trainer.

AnsteyChessclub.co.uk (ACC): Hi Ben, first of all thank you for taking part in our very first interview from the series. To start with, tell us a little bit about yourself outside of the world of chess? Who is Ben Vaughan?

Ben: I am Ben, 41 years old and I am married to my wife Karen and I have a 4 year old daughter called Kimberley. I work in Beaumont Leys as a Commercial Manager for a lighting distribution company. My other hobbies are football, (supporting Liverpool FC since I was 13/14) and cricket.

ACC: Sounds like a busy schedule, how do you find time for chess?

Ben: There isn’t a lot! I play for Radcliffe and Bingham chess club occasionally and they are based in Nottinghamshire. I don’t have time to do any studying outside of club nights any more as I am crazily busy these days.

ACC: Alright, let’s turn to Ben, the chess player, with a series of quick questions. What is your current rating, both over the board (OTB) and online?

Ben: 1600ish OTB and about 1450 blitz on chess.com.

ACC: Do you play exclusively on chess.com?

Ben: I have a membership on Lichess but I rarely go on it. I do almost exclusively play on chess.com.

ACC: What is your favourite opening and why?

Ben: My favourite opening is the Ruy Lopez for its open variations that are still being analysed to this day. I love the generally open and aggressive lines that can be played and the traps that can be fallen into for both sides.

ACC: Do you prefer it only as White, or do you like to play against it as Black as well?

Ben: Only as white. As black against 1.e4 I play the French. The reason for this is because I found it challenging to play against as a 1.e4 player myself. Again there are traps for both sides.

ACC: What type of player would you say you are?

Ben: I like to play open and aggressive games which is kind of ironic for a French player.

ACC: Why do you think that is? Is the French considered a boring opening in general?

Ben: It is considered as inferior to other more aggressive lines but I am ok with that.

ACC: What is your favourite part of the game? Are you obsessed with the openings, do you like the tactical and positioning battles of the middlegame, or do you prefer the endgame?

Ben: I don’t have a favourite part of the game. I guess if I had to choose, I would say the opening. The reason is that I view a game of chess like building a house. To build a house you need a solid foundation, just like in chess you need a solid opening to build your game from.

ACC: Alright, and what is your least favourite part of the game? If there is one?

Ben: Rook and pawn endings probably. They are so difficult and it is very easy to make a mistake without realising until it is too late!

ACC: Yes, they are notorious for being difficult. Who would you say is your favourite player?

Ben: I don’t have a particular favourite. Bobby Fischer is up there with my favourites as is Mikhail Tal – aggressive and tactical players. I have books of theirs (the Tal book was a gift from a close friend). Excellent reads when I have time!

ACC: Awesome! You stream on twitch.tv under the name notquiteagm. How did you decide to go on twitch and why did you choose this particular username? Also, how often do you stream?

Ben: I stream as often as I can really. I decided to go on Twitch myself having watched a lot of content myself. I found it fascinating that you can host a stream and have people watch you. I already teach youngsters and have previously taught adults so I thought I would give it a go myself. I am grateful to all my followers for growing the channel to 80 followers to date – this is more than I imagined I would get!
I chose notquiteagm because it had to be catchy and a little bit funny. I am some way off GM level so with a hint of sarcasm, I am notquiteagm.

ACC: You recently had a couple of streams, one with blitz and rapid games and one with puzzles. Which one do you prefer?

Ben: I genuinely 100% do not prefer one or the other. As long as people find the content engaging, that’s what means the most to me.

ACC: Alright, let’s take a look at Ben, the chess club owner and junior trainer. How would you describe owning a chess club?

Ben: Exceptionally rewarding. Seeing people coming through the door every week both new players and old players is all the reward I need. Trophies and winning things doesn’t matter to me.

ACC: You mentioned recently in your blog article that you created the Anstey Chess club because you wanted to play chess in the area. Was it a great effort and do you feel that it was worth it?

Ben: It was initially very hard, starting from scratch. I am very grateful to so many for sticking by the club when we first started and seeing out our first season. It was a case of trying to keep people interested in coming that weren’t winning games all of the time. Losing in chess is hard but it is how you learn. Seeing how much the club has grown has made every little effort worthwhile and long may new and old players keep coming through the door.

ACC: Hear, hear! How would you describe the atmosphere in Anstey Chess Club? Both during club nights and when there is a league match?

Ben: We are informal to say the least! We have a wonderful mix of talented, young and old chess players that each contribute to fun and enjoyable club nights. Match nights are quiet and respectful, as they should be.
ACC: Speaking of match nights, how do you feel about the league season so far? At the moment both teams seem to be quietly sitting mid-table in their divisions.

Ben: People measure the success of a chess club in different ways. Success for me is people coming through the door every week whereas success for others is winning trophies and picking teams to win matches. The second team is a vehicle for people new to league chess to get games. The first team is for more experienced players. I genuinely don’t mind where either side finishes in the league.

ACC: As we are on the topic, how do you decide on the team for a particular league game?

Ben: The first team pretty much picks itself. We try and give everyone the same amount of games but COVID has had an impact on numbers and affected people coming.

ACC: In chess one of the things after a game is to sit down and analyse possible lines and moves. How do you approach analysis of the games after the match? Do you leave everyone to do it themselves, or are you all involved as a team? Also, do you use engines?

Ben: The offer of post match analysis goes throughout the club for all players either on the night or at subsequent club nights. Me and Mick have always historically gone through matches for all players. Generally this is done in our minds but we have been known to use an engine on the odd occasion when we haven’t quite understood a complicated position.

ACC: Let’s turn our attention to Junior chess in Anstey! What can you tell us about the junior chess program you are involved in?

Ben: I run a children’s chess club in partnership with Beanies soft play in Anstey. It is for all children of all abilities and costs £3 per child per session. The sessions are on Saturday mornings from 9-11am.

ACC: Can you describe a typical training session?

Ben: Initially I try to assess the ability of a new child with a game against another. We will then try various exercises based on ability that make the sessions fun whilst teaching them the rules and what you can and can’t do.

ACC: Are the parents involved as well?

Ben: Not usually no. They can sit and watch or if a child is particularly nervous then their parent may sit and play with them to help them settle.

ACC: Awesome, a few final thoughts as we know you are busy. In just a few words, what makes Anstey Chess Club the place to go and play OTB?

Ben: We are a fun, relaxed chess club with a wide range of abilities and a very welcoming atmosphere.

ACC: Where can people find yourself? Both live and online?

Ben: Anstey Methodist church centre in Anstey on Thursday evenings from 7pm onwards from September until June. Online at Ansteychessclub.Co.uk or on twitch twitch.tv/notquiteagm. We are also on Facebook – search for Anstey Chess Club.

ACC: Finally, what advice would you give to the aspiring chess players out there?

Ben: Come to Anstey Chess Club! If not, keep learning, keep playing and it is hard to lose but it is how you learn. Ultimately at club level, you will learn all of the time by winning and losing.

ACC: Thanks, Ben, you have been awesome! Please feel free to share any final thoughts.

Ben: Thank you for having me! As a final thought I will say that chess is a wonderful and inclusive game for all ages, abilities, genders, religions and races. If you fancy a game, come down to Anstey Chess Club!