Basic Checkmating Patterns – Part Four

When it comes studying chess, one of the most underestimated elements of the game are the checkmating patterns. In this series we look at this very important part, focusing on the most common checkmates and characteristic patterns leading to them.

We have already looked at the majority of the pieces and their abilities to deliver checkmate. In this part of the series we take a look at the checkmating ability of the last piece we look at – the bishop. Controlling diagonals, this mighty piece always relies on the assistance of another piece, whether it would be a queen, rook, or even another bishop. Below we look at five common patterns involving a bishop and a major piece.

1. Morphy’s mate

Named after the great Paul Morphy, this checkmating pattern is one of the most popular positions in the world of chess. The pattern is executed with the combined action of the bishop and a rook.

As seen from the diagram above, the black king is completely cut off on the h-file, with his own pawn preventing the king from moving around the h-file. The rook cuts off the g-file, completely restricting the king’s movement. The only thing left for the pattern to work is the bishop delivering checkmate from d4. This pattern could also be used in conjunction with a discovered attack as seen from the diagram below.

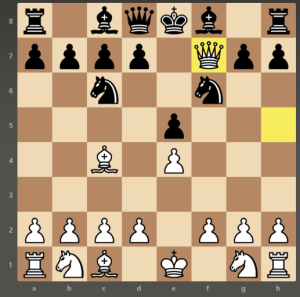
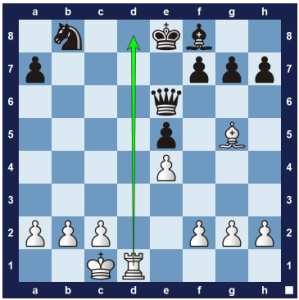
The above position is from the game Reshevsky – Shainswit, 1951. In the actual game, Black resigned after Rg3+ since, as seen above, the only moves to slow down the checkmate are giving up the queen and the rook. An interesting fact is that the checkmating pattern received its name from a game in which it did not feature – Paulsen – Morphy, 1857. The game inspired an idea for building up into the checkmating pattern using a beautiful queen sacrifice against a kingside castled king.

By taking the knight, the queen threatens mate in one with Qxg7# so taking back with the g-pawn is compulsory. This opens up the g-file, creating the opportunity for the white rook to cut the black king off with a check, followed by the lethal blow from the bishop with Bxf6#.

2. Pilsbury mate

Named after another great XIX century player in Harry Pilsbury, this checkmate pattern is quite suited to be trained alongside the abovementioned Morphy mate as they are virtually variants of the same idea. In this particular pattern, the bishop and the rook work in the same way as in the Morphy mate but this time the rook delivers the final blow, as the bishop is controlling the king’s escape.

In the example above, the bishop is controlling the long a1-h8 diagonal, and with the black king restricted by his own pieces, the rook slides over to g1, delivering checkmate. The below diagram shows one possible buildup for this checkmating pattern. The position is from Savic – Radojevic, 2006.

After the white bishop captures the black knight, it seems that the white queen is up for grabs, but capturing it, as seen above, unleashes the potential of the dark-coloured black bishop and the remaining white rook. Not controlled by the black knight anymore, the dark-squared bishop gives a check on g7, followed by a discovered check with Bf6+, and after the queen tries one last attempt to stop the checkmate, the rook captures the black lady with a crushing Rxg5#. It is worth to note that just retaking the white bishop at the first move as opposed to capturing the ‘hanging’ queen would have freed an escape square on f7 for Black, should he needed it. Another common buildup to the Pilsbury mate involves a rook/queen sacrifice.

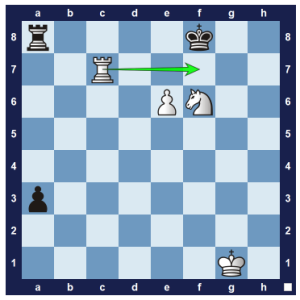
In this case, the rook sacrifices itself on g7, thus opening the g-file for the bishop and the d1-rook. It is important to note that after the king slides over to h8, any move other than the double check Rg8+ is most likely losing for White, as the knight can block the bishop on d4, while the queen could exchange itself if needed. However, the double check means that the black king has to do something about it and the only option is to retake on g8, hence giving White the opportunity to execute checkmate with Rg1#.

3. Opera mate

The Opera checkmate pattern takes its name from a famous game called the Opera game. Unsurprisingly, the origins of this patter come from Paul Morphy again, who played against the Duke of Brunswick and Count Isouard in Paris, in 1858, while watching opera. This pattern again involves the combined action of the rook and the bishop, and is another pattern that is probably best learned in conjunction with the abovementioned Morphy and Pilsbury mates, as it relies on similar principles. The final position of the actual opera game is shown below.

The black king is cut off by his own pieces, and just like in the Pilsbury mate, the bishop is controlling his only squares. What is left for the white rook, is to deliver swiftly checkmate on d8. In the actual game, this move was preceded by a beautiful queen sacrifice well in the tradition of the great Paul Morphy.

The pattern is quite common when the enemy king is protected by a triangle pawn structure, like in the King’s Indian and Pirc defences. It is important to note, that the rook could be anywhere on the rank/file where the checkmate is delivered, as long as the opposing king is controlled by the bishop.

In this last example, the material advantage and mating threats do not help black, as the white rooks attack Black’s back rank, weakened significantly by the activity of the bishop. All the moves are forced and White emerges triumphant after 1. Rd8+ Rxd8 2. Rxd8#.

4. Balestra mate

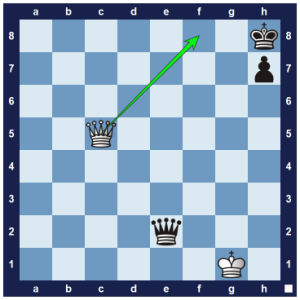
In the last two examples, the powerful combination of the mighty queen and a bishop is looked at, starting from the Balestra mate. This checkmating pattern takes its name from a fencing term for powerful lunges, as the bishop lunges to checkmate the opposing king, restricted by the powerful queen.

As seen in the above diagram, the black king has only one square left to move, which is conveniently situated on a light square. The white bishop lunges with Bc6# swiftly delivering checkmate. In the game Bang – Sayre, 1921, Black explores this pattern to deliver checkmate on move 27.

The combined work of the queen and the bishop leads to series of forcing moves to get the white king on c1, cut off from the b-file and the d1-a4 diagonal by the black queen. The bishop performs only a small hop this time to deliver the final blow with Be3#.

5. Max Lange’s mate

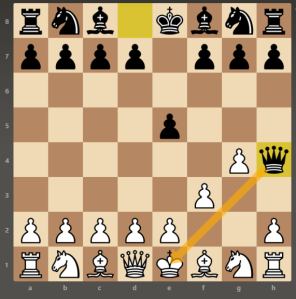
The last checkmating pattern in this article is the Max Lange’s mate, named after another player from the XIX century and involving again the queen and a bishop. This checkmating pattern exploits weak squares around the king.

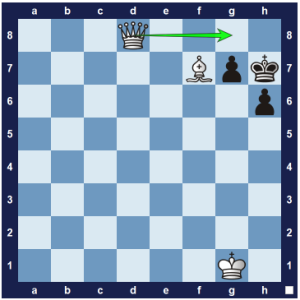
In the above example, the light squares around the black king are very weak and the queen and light-squared bishop exploit them with their combined action. The bishop restricts the king on the h-file, covering the two possible escape squares g8 and g6, while the queen controls the back rank, completely restricting the black king. The queen delivers the checkmate with Qf8#. An example of a beautiful buildup and execution of this checkmate pattern is found in the game Sikorova – Quinn, 2001.

With the black queen looking to exploit the white king’s exposed position, White has to keep playing only forced moves. As seen from the diagram above, with series of checks, including a rook sacrifice, the black king is forced on h8, with the white bishop positioned perfectly on f7. The white queen jumps on c8 to deliver one check, and then slides over with a Qg8#, checkmating the black king.

Basic Checkmating Patterns – Part Three

When it comes studying chess, one of the most underestimated elements of the game are the checkmating patterns. In this series we look at this very important part, focusing on the most common checkmates and characteristic patterns leading to them.

In this part of the series we take a look at common checkmating patterns involving the knight. With its peculiar movement, the horse-looking piece usually needs an acomplice in executing the pattern, whether it will be a rook or a queen.

1. Anastasia’s mate

To execute Anastasia’s mate, a player would need a knight and a major piece – either a queen or a rook. The function of the knight is to cut-off the king in the corner of the board and it usually accomplishes the task with the help of an enemy pawn. The major piece involved, most commonly a rook, then delivers the checkmate on the file where the king is stuck. The name comes from the 18th century writer Johann Jakob Wilhelm Heinse’s novel ‘Anastasia und das Schachspiel’. The following position is one of the most common ways to deliver the checkmate:

The king is stuck on the h-file and Rh3# proves to be devastating, as the knight cuts off the king from the g6 and g8 squares, while the black pawn restricts the king from escaping on g7. Another example of the pattern is shown below, this time with more pieces on the board and in addition, the rook is attacking the back rank, as opposed to the h-file.

Although someone could argue that the above diagram shows a back rank mate, this is again a typical example of an Anastasia’s mate. The king is again cut off on the back rank from the knight and the rook delivers the checkmate swiftly on d8. The final diagram is taken from the game Hammer vs Carlsen, 2003, Greece.

White tries to kick out the knight by attacking it twice, but they are too slow as Black happily sacrifices the queen to free the h-file for the rook which promptly delivers checkmate.

2. Corner mate

Unlike most of the checkmating patterns which we looked at so far, the Corner Checkmate’s name has the simplest background in the world of chess. The idea of this pattern is to exploit positions where the opponent’s king is stuck on one of the corners of the board. This pattern is usually executed by the combined activity of the knight and the rook.

In the diagram above, the king is cut off from any other squares on the h-file by his own pawn. The knight jumps on f7 to deliver check, discovering the control of the g-file by the rook and completely cutting off the black king and thus delivering checkmate. This is also a good example of a tactical pattern, called Discovered Attack, which we would look at in another series in the future. An example of exploiting the position of the opponent king to deliver corner mate is shown in the diagram below which was taken from the game Myers vs Polyakoff, 1955.

The white rook is looking to skewer the black knight after attacking the queen. Unfortunately for White, the queen sacrifices herself to free the f2 square for the black knight, as the only escape route for the king (the g-file) is cut off by the rook. Even worse for White, the queen has to be taken as otherwise we end up in the other version of the corner mate, as shown in the below diagram.

Unlike with any other piece, the queen does not need anyone’s help to deliver corner checkmate. The unique abilities of this strongest piece to control both files and diagonals makes it the perfect attacker, since the only escape square for the king (h7) is occupied by the black pawn.

3. Hook mate

Another common checkmate pattern delivered by the combined efforts of knight and rook (or obviously queen, as it has all of the rook’s properties and strengths) is the Hook checkmate. Its name comes from the resulting shape of the attacking pieces, resembling a hook.

As seen in the above diagram, the king has no squares, as the rook is covering the eighth rank, the knight is attacking the d7 square and the white pawn covers the d6 square. If it were Black’s move, the king would have the escape through c6 and b5, but unfortunately for them, White attacks the king with Rc8# which is the lethal blow since all escape squares are covered or blocked, as in the case with the black pawn on b7. This pattern featured in a famous game from 1892 between Frank Marshall and William Napier, as seen from the diagram below.

In this example, White is down quite a lot of material. Nevertheless, Marshall uses under promotion to a knight to cut off the black king from escaping and paralyses Black due to the delivered check. To make it worse, after Kh8 the knight jumps on g6, discovering a check from the rook. The king goes back to h7, only to be checkmated with Rh8#. Unfortunately for Black, Kg8 after the promotion would not help, as the hook mate works in the other direction as well after Ng6 Kf7 Rf8#.

4. Vukovic mate

The rook and the knight have a centuries-long partnership as seen previously in the Arabian mate and the checkmate patterns showed so far in this article. The Vukovic mate is another example of the success of this partnership in delivering a mate. This time the tandem is helped by another piece in squeezing the opposing and king and eventually delivering the final strike. The pattern is named after IM Vladimir Vukovic who showed it in his brilliant book “The Art of Attack in Chess”.

As shown in the above diagram, the black king is completely cut off by the white knight and rook. With the help of the pawn on e7, the rook arrives on f7, delivering checkmate. The role of the pawn is very important, as it supports the rook in the attack, and it could be also performed by a king or a bishop. An example of this checkmate pattern was the game between Williams and Staunton from 1851.

The white king attacks the black rook, but then the black knight comes to the rescue with a strong attack on the king resulting in the position we are looking for when aiming to deliver Vukovic checkmate. With the help of the black king controlling f2, the rook steps bravely on this square, delivering checkmate with Rf2#.

5. Smothered mate

The last checkmate pattern we will be looking at is the probably the most beautiful knight action on the board. The pattern takes its name from the position of the opponent king which is completely cut off and unable to move. The knight jumps unopposed in the vicinity and swiftly delivers checkmate.

In the above diagram, the king is surrounded by its own pieces, completely cutting him off from any escape squares. The only thing left for the white knight is to jump with Nf7#. One of the most beautiful buildups for the pattern includes a queen sacrifice to ‘smother’ the king.

The knight and the queen work very good together with a double check to push the enemy king in the corner. The queen then sacrifices itself on g1 to create the ‘smothered’ structure after which the knight jumps with Nf2# to deliver the final blow. Notice that the knight has to initially jump on h6 as opposed to any other square. This way the minor piece supports the g1 square, so the white king will not be able to capture the black queen as the checkmating pattern will not work. Another example for a smothered mate comes from the very famous Caro-Kann defence, Karpov variation, where if Black gets carried away and does not pay attention, it could be lethal for them.

The move Qe2 from White is very important as it creates the configuration of an absolute pin, as the knight is looking to free the e-file for the queen’s dominance. This way the e7-pawn cannot capture the knight and the Black king is mated on move 6. This sequence is a great example of combining different tactical ideas – in this case a discovered attack from the knight and a pin from the queen combine with the smothered mate to win the game for White.

Basic Checkmating Patterns – Part Two

When it comes studying chess, one of the most underestimated elements of the game are the checkmating patterns. In this series we look at this very important part, focusing on the most common checkmates and characteristic patterns leading to them.

In part two of the series we will turn our attention on various checkmating patterns involving the heavy artillery of the chess pieces – the rooks and the queen. At the end we will look at a famous trap involving a thematical queen sacrifice.

1. Lawnmower checkmate.

Also known as the ‘Ladder checkmate’ and the ‘Rook’s Roller checkmate’, the Lawnmower Mate is one of the basic checkmating patterns which every beginner ought to know. It could be done with either a queen and a rook, two rooks, or even two queens, if a pawn has been promoted. The actual pattern involves alternating the pieces in cutting off files or ranks for the opposite king, until the latter is pushed in the corner and checkmated, as shown in the below picture.

As mentioned above, the checkmate could also be delivered using two rooks, however, the player trying to deliver the mate should be careful not to hang the rook closer to the king, usually accomplished by moving the rook on the other side of the board.

2. Blind swine checkmate.

Commonly encountered in chess is the expression “Pigs on the 7th” referring to two rooks on the seventh rank (if White, on the second rank if Black). Following the same reference idea, a Blind swine checkmate is usually delivered by two connected rooks on the seventh (second) rank, whereby the opposite king is on the last rank and its escape towards the central squares of the rank is cut off by either opposite or same colour piece.

In the below example, both black rooks land on the second rank and after quick grab of the black queen by its white-coloured counterpart, the blind pigs start devouring the second rank and eventually deliver mate.

In the game between Swiderski and Nimzowitsch from 1905, the German chess master used a combination of a queen sacrifice, powerful centralised knight and two rooks infiltrating on the seventh rank to defeat the famous Danish Grandmaster Aron Nimzowitsch. As result of the great control of the f8-square exercised by the white knight, the black king has only two squares to move and is shortly mated in spite of being six points up in material after the white queen sacrifice.

3. Triangle checkmate.

A common pattern leading to checkmate is the RailRoad method. In this method, the attacking queen and one of the rooks push the king towards the edge of the board until one of the attacking pieces usually delivers checkmate. The two main ways in actually delivering the final blow are the Triangle checkmate and the Killbox checkmate.

The Triangle checkmate is usually delivered when a piece is restricting the movement of the opposite king on the file/rank the latter occupies. The attacking queen and rook take turns in squeezing the king while protecting each other with the use of the queen’s ability to control diagonals as well as files/ranks. Eventually, the queen delivers the checkmate, with the resulting formation resembling a triangle which is the root of the name for the checkmate pattern.

The same principle can be used to push the defending king towards the edge of the board if there is no piece to restrict its movement, as shown in the below diagram from the Durin vs Bross game from 1958.

4. Killbox checkmate.

The second checkmate pattern involving the RailRoad technique (sliding the queen and rook on the sides of the king, similar to the train wheels on the rail roads) is the Killbox checkmate. This pattern takes its name from the powerful work of the queen and the rook to create the so-called ‘kill box’, trapping and checkmating the defending king. As opposed to the above Triangle mate, this time the rook delivers the final blow to the opponent.

In the Geller vs Kogan game from 1946, White utilises the above checkmating idea in combination with a rook sacrifice. After Black accepts the sacrifice, Geller creates the “Kill box” and finishes off his opponent.

5. Legal’s checkmate.

Legal’s checkmate is a beautiful checkmating pattern which arises from an opening trap involving queen sacrifice. Usually played by White, it is named after the French player Sire de Légal who allegedly played the trap in 1750 against Saint Brie in a game at rook’s odds. Nowadays, the opening trap is commonly encountered, especially at amateur levels, and it usually occurs with the following line:

Although it is commonly played by White, Black can also use similar concept and deliver checkmate, albeit with a bishop as opposed to the knight. The trap usually arises from the Petrov’s defense and the checkmate is acheved in the following manner:

Involving a queen sacrifice and checkmating patterns with minor pieces, the Legal checkmate is a compulsory pattern to know especially for players at amateur and club level.

Basic Checkmating Patterns – Part One

When it comes studying chess, one of the most underestimated parts of the game are the checkmating patterns. In this series we look at this very important part of the game, focusing on the most common checkmates and characteristic patterns leading to them.

In the first part of the series we will look at some of the most basic checkmating patterns which are more or less compulsory to know by any player regardless of their level.

1. Fool’s mate.

The Fool’s mate is the only two-move checkmate in chess. It is achieved by through the sequence 1. f3 e5 2. g4 Qh4#. As the name of the checkmate suggests, it requires a significant blunder by White which rarely occurs even at beginner levels. However, it is always a useful pattern to have in mind as it places emphasis on the importance of protecting the e1-h4 diagonal for White and the e8-h5 diagonal for Black which are the routes for the mating attack. The usual way of doing this (for example, in the Dutch defence) is by placing your knight on f3 for White or f6 for Black, protecting the entry points on h4 and h5, respectively. A famous trap in the Dutch defence exploits the above idea:

Teed vs Delmar, 1986

2. Scholar’s mate.

Another basic checkmatting pattern is the four-move checkmate, known as the Scholar’s mate. The nightmare of many beginner players, it is by far the most used checkmating pattern at the lower ratings. The name of the pattern comes from a 1656 text by Francis Beale The Royal Game of Chess-Play.

There are various ways to get to the actual checkmate, the most common being via:

1. e4 e5

2. Qh5 (White attacks the pawn on e5) Nc6 (Black defends the pawn)

3. Bc4 (the bishop attacks the weak f7-pawn) Nf6?? (Black gets carried away with attack on the queen, blundering checkmate)

4. Qxf7#.

The position can be reached in different ways and it is one of the most played checkmating patterns in general, leading to quick wins even at online levels of 1000+ on chess.com. Although more experienced players are trained at the main ways to avoid it, as well as counter-attacking through exploitation of the early queen development by White, it is always an important pattern to remember, mainly due to its emphasis on the vulnerability of the f7-pawn.

In general, at the beginning of a chess game there are two ‘weak’ pawns on the board – f2 for White and f7 for Black. The reason they are called ‘weak’ is that they are basically protected by only one piece – the king. The latter fact often makes them a point for attack by the opponent’s pieces, including further on in the middlegame.

An easy defence and further plan for Black is to play 1. e4 e5 2. Qh5 Nc6 3. Bc4 g6 4. Qf3 Nf6. At the end of the sequence, Black has advantage in development, clear plan to fianchetto their bishop (click here for more on the fianchetto) and castle short, while White has a queen in the centre which is a target for pawns and minor pieces and is occupying the f3 square which is rather annoying for the g1-knight.

3. Back rank checkmate.

Another very common checkmate is the Back Rank mate which exploits situations when the white king cannot move on the second rank or the black king cannot move on the seventh rank and the first, respectively the eighth rank, is not sufficiently protected. As suggested by the name, one of the major attacking pieces (queen or rook) moves to the back rank delivering checkmate.

The most common checkmate on the back rank is when the king is still in an usual castled position with all three pawns restricting his movement and all major pieces have left the back rank. One of the simplest examples is shown below, where Black is so carried away with going for a checkmate, they completely forget about the weak back rank of their own and get checkmated in three moves.

Another common pattern leading to back rank checkmate exploits the abovementioned weak f2- or f7-square combined with the king being on the back rank on the g-file and the g- and h-pawn restricting his movement. The attacker uses a queen-led battery on the f-file and the patter starts with a check, pushing the king in the corner. In the following diagram, Black is ahead nine points of material, but their back rank is vulnerable leading to checkmate in three moves.

Although the most common obstruction of the attacked king consists of pawns in front of him, other pieces such as knights or bishops can also limit the king’s movement. In the game Bird-Zukertort from 1886, a beautiful combination by Bird leads to resignation by Black due to several threats of a back rank mate, with Zuketort incapable of dealing with all of them. With the endgame in sight on move 36 Black picks up the e4 pawn in an attempt to gain material advantage providing Bird with the opportunity to use the position of the white knight combined with the powerful rook on the d-file and the queen controlling two key diagonals. After 37. Qxf6+ Black resigned, a possible continuation with a back rank mate is shown below.

4. Arabian checkmate.

Possibly one of the simplest, yet often missed checkmates, is the Arabian mate. It is considered by some to be the oldest checkmate pattern in the game of chess and according to this article it has featured in old Arabian manuscripts intended for an older version of chess where the rooks and the knights were the most powerful pieces. The way to deliver an Arabian mate is with a rook and knight when the king is in the corner of the board.

The rook boxes the king to leave him only the h7 square, which is protected by the kinght while the latter also protects the white major piece. Whenever the king is in the corner and both rook and knight are in the proximity, it is a good idea to look for a pattern which will lead to the Arabian mate. For example, in the Reiner-Steinitz game from 1860, after being attacked by 15. f4 the black knight jumps on the f3-square from where it is capable to coordinate with a rook for delivering Arabian mate. White misses the combination that follows and greedily picks up the g4-pawn, opening the g-file for the rook. What follows is a beautiful queen sacrifice typical for the good old days of romantic chess.

It is worth noticing that Black offers the hanging queen first on h4 with the idea that Rxh4 would lead to the same checkmate pattern which is why White refuses the sacrifice. Nevertheless, after Qxh2+ Reinier is left with no choice and in the tradition of the period plays until the very end. In another game from the same era, Anderssen – Schallopp, played in 1864, Black delivers an Arabian mate with a beautiful combination and under the threat of a back rank mate (discussed above).

Black utilises successfully the f4-pawn, using it as an anchor for the rook, and the pin on the second rank, and after the rook sacrifice, the Arabian checkmate is delivered.

5. Damiano’s checkmate.

The last pattern discussed in this very first part of the series is the Damiano’s checkmate. The name comes from the work of Pedro Damiano, a 16th century chess player, who is considered to be the first person writing about this checkmate pattern, in 1512. Commonly encountered, this mate is delivered by the queen which is protected by a pawn on g6 (if White attacks) or g3 (if Black attacks) and it relies on the king being restricted by the pawn and another piece to move onto the f-file (or c-file if the attack is on the other side of the board, with the pawn on b6/b3 respectively).

One of the most common patterns leading to this checkmate starts with a rook sacrifice, either to lure the king on the h-file(a-file) or to open the latter file by taking the corresponding pawn on the seventh/second rank. In the below example, Black sacrifices two rooks in order to keep the white king on the h-file, before delivering the final blow with Qh7#.

A variation of the Damiano’s checkmate is the so called Damiano’s Bishop checkmate, where the anchor for the queen is a bishop as opposed to a pawn. In the following example, White uses their rook to attack the king and removing the knight and opening the g-file for the queen. Nxh8 is compulsory as without the knight to protect h8, the move will be a different type of checkmate known as the Opera mate, which we will discuss in a further part of the series. With the rook on e8 preventing the king’s escape, Qg7# is unavoidable.