When it comes studying chess, one of the most underestimated elements of the game are the checkmating patterns. In this series we look at this very important part, focusing on the most common checkmates and characteristic patterns leading to them.
In this part of the series we take a look at common checkmating patterns involving the knight. With its peculiar movement, the horse-looking piece usually needs an acomplice in executing the pattern, whether it will be a rook or a queen.
1. Anastasia’s mate
To execute Anastasia’s mate, a player would need a knight and a major piece – either a queen or a rook. The function of the knight is to cut-off the king in the corner of the board and it usually accomplishes the task with the help of an enemy pawn. The major piece involved, most commonly a rook, then delivers the checkmate on the file where the king is stuck. The name comes from the 18th century writer Johann Jakob Wilhelm Heinse’s novel ‘Anastasia und das Schachspiel’. The following position is one of the most common ways to deliver the checkmate:

The king is stuck on the h-file and Rh3# proves to be devastating, as the knight cuts off the king from the g6 and g8 squares, while the black pawn restricts the king from escaping on g7. Another example of the pattern is shown below, this time with more pieces on the board and in addition, the rook is attacking the back rank, as opposed to the h-file.

Although someone could argue that the above diagram shows a back rank mate, this is again a typical example of an Anastasia’s mate. The king is again cut off on the back rank from the knight and the rook delivers the checkmate swiftly on d8. The final diagram is taken from the game Hammer vs Carlsen, 2003, Greece.

White tries to kick out the knight by attacking it twice, but they are too slow as Black happily sacrifices the queen to free the h-file for the rook which promptly delivers checkmate.
2. Corner mate
Unlike most of the checkmating patterns which we looked at so far, the Corner Checkmate’s name has the simplest background in the world of chess. The idea of this pattern is to exploit positions where the opponent’s king is stuck on one of the corners of the board. This pattern is usually executed by the combined activity of the knight and the rook.

In the diagram above, the king is cut off from any other squares on the h-file by his own pawn. The knight jumps on f7 to deliver check, discovering the control of the g-file by the rook and completely cutting off the black king and thus delivering checkmate. This is also a good example of a tactical pattern, called Discovered Attack, which we would look at in another series in the future. An example of exploiting the position of the opponent king to deliver corner mate is shown in the diagram below which was taken from the game Myers vs Polyakoff, 1955.

The white rook is looking to skewer the black knight after attacking the queen. Unfortunately for White, the queen sacrifices herself to free the f2 square for the black knight, as the only escape route for the king (the g-file) is cut off by the rook. Even worse for White, the queen has to be taken as otherwise we end up in the other version of the corner mate, as shown in the below diagram.
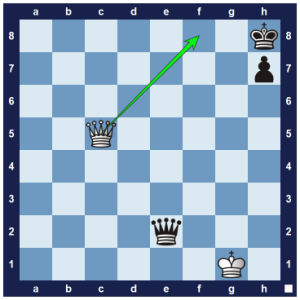
Unlike with any other piece, the queen does not need anyone’s help to deliver corner checkmate. The unique abilities of this strongest piece to control both files and diagonals makes it the perfect attacker, since the only escape square for the king (h7) is occupied by the black pawn.
3. Hook mate
Another common checkmate pattern delivered by the combined efforts of knight and rook (or obviously queen, as it has all of the rook’s properties and strengths) is the Hook checkmate. Its name comes from the resulting shape of the attacking pieces, resembling a hook.

As seen in the above diagram, the king has no squares, as the rook is covering the eighth rank, the knight is attacking the d7 square and the white pawn covers the d6 square. If it were Black’s move, the king would have the escape through c6 and b5, but unfortunately for them, White attacks the king with Rc8# which is the lethal blow since all escape squares are covered or blocked, as in the case with the black pawn on b7. This pattern featured in a famous game from 1892 between Frank Marshall and William Napier, as seen from the diagram below.

In this example, White is down quite a lot of material. Nevertheless, Marshall uses under promotion to a knight to cut off the black king from escaping and paralyses Black due to the delivered check. To make it worse, after Kh8 the knight jumps on g6, discovering a check from the rook. The king goes back to h7, only to be checkmated with Rh8#. Unfortunately for Black, Kg8 after the promotion would not help, as the hook mate works in the other direction as well after Ng6 Kf7 Rf8#.
4. Vukovic mate
The rook and the knight have a centuries-long partnership as seen previously in the Arabian mate and the checkmate patterns showed so far in this article. The Vukovic mate is another example of the success of this partnership in delivering a mate. This time the tandem is helped by another piece in squeezing the opposing and king and eventually delivering the final strike. The pattern is named after IM Vladimir Vukovic who showed it in his brilliant book “The Art of Attack in Chess”.
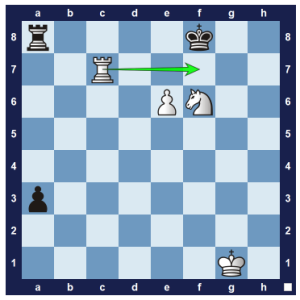
As shown in the above diagram, the black king is completely cut off by the white knight and rook. With the help of the pawn on e7, the rook arrives on f7, delivering checkmate. The role of the pawn is very important, as it supports the rook in the attack, and it could be also performed by a king or a bishop. An example of this checkmate pattern was the game between Williams and Staunton from 1851.

The white king attacks the black rook, but then the black knight comes to the rescue with a strong attack on the king resulting in the position we are looking for when aiming to deliver Vukovic checkmate. With the help of the black king controlling f2, the rook steps bravely on this square, delivering checkmate with Rf2#.
5. Smothered mate
The last checkmate pattern we will be looking at is the probably the most beautiful knight action on the board. The pattern takes its name from the position of the opponent king which is completely cut off and unable to move. The knight jumps unopposed in the vicinity and swiftly delivers checkmate.

In the above diagram, the king is surrounded by its own pieces, completely cutting him off from any escape squares. The only thing left for the white knight is to jump with Nf7#. One of the most beautiful buildups for the pattern includes a queen sacrifice to ‘smother’ the king.
The knight and the queen work very good together with a double check to push the enemy king in the corner. The queen then sacrifices itself on g1 to create the ‘smothered’ structure after which the knight jumps with Nf2# to deliver the final blow. Notice that the knight has to initially jump on h6 as opposed to any other square. This way the minor piece supports the g1 square, so the white king will not be able to capture the black queen as the checkmating pattern will not work. Another example for a smothered mate comes from the very famous Caro-Kann defence, Karpov variation, where if Black gets carried away and does not pay attention, it could be lethal for them.

The move Qe2 from White is very important as it creates the configuration of an absolute pin, as the knight is looking to free the e-file for the queen’s dominance. This way the e7-pawn cannot capture the knight and the Black king is mated on move 6. This sequence is a great example of combining different tactical ideas – in this case a discovered attack from the knight and a pin from the queen combine with the smothered mate to win the game for White.
