When it comes studying chess, one of the most underestimated parts of the game are the checkmating patterns. In this series we look at this very important part of the game, focusing on the most common checkmates and characteristic patterns leading to them.
In the first part of the series we will look at some of the most basic checkmating patterns which are more or less compulsory to know by any player regardless of their level.
1. Fool’s mate.
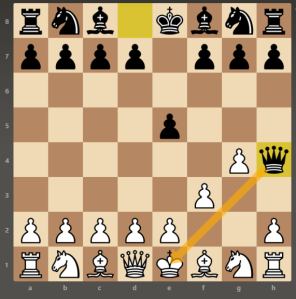
The Fool’s mate is the only two-move checkmate in chess. It is achieved by through the sequence 1. f3 e5 2. g4 Qh4#. As the name of the checkmate suggests, it requires a significant blunder by White which rarely occurs even at beginner levels. However, it is always a useful pattern to have in mind as it places emphasis on the importance of protecting the e1-h4 diagonal for White and the e8-h5 diagonal for Black which are the routes for the mating attack. The usual way of doing this (for example, in the Dutch defence) is by placing your knight on f3 for White or f6 for Black, protecting the entry points on h4 and h5, respectively. A famous trap in the Dutch defence exploits the above idea:
2. Scholar’s mate.
Another basic checkmatting pattern is the four-move checkmate, known as the Scholar’s mate. The nightmare of many beginner players, it is by far the most used checkmating pattern at the lower ratings. The name of the pattern comes from a 1656 text by Francis Beale The Royal Game of Chess-Play.
There are various ways to get to the actual checkmate, the most common being via:
1. e4 e5
2. Qh5 (White attacks the pawn on e5) Nc6 (Black defends the pawn)
3. Bc4 (the bishop attacks the weak f7-pawn) Nf6?? (Black gets carried away with attack on the queen, blundering checkmate)
4. Qxf7#.
The position can be reached in different ways and it is one of the most played checkmating patterns in general, leading to quick wins even at online levels of 1000+ on chess.com. Although more experienced players are trained at the main ways to avoid it, as well as counter-attacking through exploitation of the early queen development by White, it is always an important pattern to remember, mainly due to its emphasis on the vulnerability of the f7-pawn.
In general, at the beginning of a chess game there are two ‘weak’ pawns on the board – f2 for White and f7 for Black. The reason they are called ‘weak’ is that they are basically protected by only one piece – the king. The latter fact often makes them a point for attack by the opponent’s pieces, including further on in the middlegame.
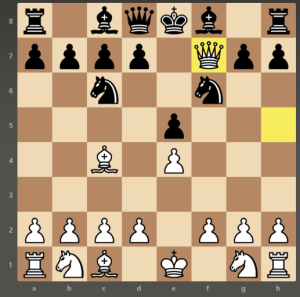
An easy defence and further plan for Black is to play 1. e4 e5 2. Qh5 Nc6 3. Bc4 g6 4. Qf3 Nf6. At the end of the sequence, Black has advantage in development, clear plan to fianchetto their bishop (click here for more on the fianchetto) and castle short, while White has a queen in the centre which is a target for pawns and minor pieces and is occupying the f3 square which is rather annoying for the g1-knight.

3. Back rank checkmate.
Another very common checkmate is the Back Rank mate which exploits situations when the white king cannot move on the second rank or the black king cannot move on the seventh rank and the first, respectively the eighth rank, is not sufficiently protected. As suggested by the name, one of the major attacking pieces (queen or rook) moves to the back rank delivering checkmate.
The most common checkmate on the back rank is when the king is still in an usual castled position with all three pawns restricting his movement and all major pieces have left the back rank. One of the simplest examples is shown below, where Black is so carried away with going for a checkmate, they completely forget about the weak back rank of their own and get checkmated in three moves.
Another common pattern leading to back rank checkmate exploits the abovementioned weak f2- or f7-square combined with the king being on the back rank on the g-file and the g- and h-pawn restricting his movement. The attacker uses a queen-led battery on the f-file and the patter starts with a check, pushing the king in the corner. In the following diagram, Black is ahead nine points of material, but their back rank is vulnerable leading to checkmate in three moves.
Although the most common obstruction of the attacked king consists of pawns in front of him, other pieces such as knights or bishops can also limit the king’s movement. In the game Bird-Zukertort from 1886, a beautiful combination by Bird leads to resignation by Black due to several threats of a back rank mate, with Zuketort incapable of dealing with all of them. With the endgame in sight on move 36 Black picks up the e4 pawn in an attempt to gain material advantage providing Bird with the opportunity to use the position of the white knight combined with the powerful rook on the d-file and the queen controlling two key diagonals. After 37. Qxf6+ Black resigned, a possible continuation with a back rank mate is shown below.
4. Arabian checkmate.
Possibly one of the simplest, yet often missed checkmates, is the Arabian mate. It is considered by some to be the oldest checkmate pattern in the game of chess and according to this article it has featured in old Arabian manuscripts intended for an older version of chess where the rooks and the knights were the most powerful pieces. The way to deliver an Arabian mate is with a rook and knight when the king is in the corner of the board.
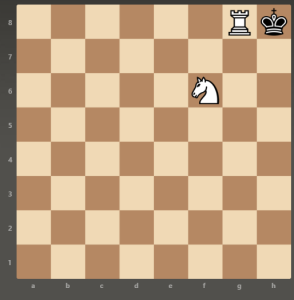
The rook boxes the king to leave him only the h7 square, which is protected by the kinght while the latter also protects the white major piece. Whenever the king is in the corner and both rook and knight are in the proximity, it is a good idea to look for a pattern which will lead to the Arabian mate. For example, in the Reiner-Steinitz game from 1860, after being attacked by 15. f4 the black knight jumps on the f3-square from where it is capable to coordinate with a rook for delivering Arabian mate. White misses the combination that follows and greedily picks up the g4-pawn, opening the g-file for the rook. What follows is a beautiful queen sacrifice typical for the good old days of romantic chess.
It is worth noticing that Black offers the hanging queen first on h4 with the idea that Rxh4 would lead to the same checkmate pattern which is why White refuses the sacrifice. Nevertheless, after Qxh2+ Reinier is left with no choice and in the tradition of the period plays until the very end. In another game from the same era, Anderssen – Schallopp, played in 1864, Black delivers an Arabian mate with a beautiful combination and under the threat of a back rank mate (discussed above).
Black utilises successfully the f4-pawn, using it as an anchor for the rook, and the pin on the second rank, and after the rook sacrifice, the Arabian checkmate is delivered.
5. Damiano’s checkmate.
The last pattern discussed in this very first part of the series is the Damiano’s checkmate. The name comes from the work of Pedro Damiano, a 16th century chess player, who is considered to be the first person writing about this checkmate pattern, in 1512. Commonly encountered, this mate is delivered by the queen which is protected by a pawn on g6 (if White attacks) or g3 (if Black attacks) and it relies on the king being restricted by the pawn and another piece to move onto the f-file (or c-file if the attack is on the other side of the board, with the pawn on b6/b3 respectively).

One of the most common patterns leading to this checkmate starts with a rook sacrifice, either to lure the king on the h-file(a-file) or to open the latter file by taking the corresponding pawn on the seventh/second rank. In the below example, Black sacrifices two rooks in order to keep the white king on the h-file, before delivering the final blow with Qh7#.
A variation of the Damiano’s checkmate is the so called Damiano’s Bishop checkmate, where the anchor for the queen is a bishop as opposed to a pawn. In the following example, White uses their rook to attack the king and removing the knight and opening the g-file for the queen. Nxh8 is compulsory as without the knight to protect h8, the move will be a different type of checkmate known as the Opera mate, which we will discuss in a further part of the series. With the rook on e8 preventing the king’s escape, Qg7# is unavoidable.